PS About shop portfolio
Showing posts with label how to. Show all posts

10.11.2012

string dream catcher diy

This is the next installment of my booth decor. I saw similar pieces in an Anthro window recently and was just smitten. These are super simple to make and create a sort of whimsy to any room, wall, or table!


steps are as follows // grab your supplies which include string (or yarn), cross stitch hoops, & scissors. tie a knot around one of the hoops. proceed to wrap the string from side to side around the hoop. once you feel like you've filled the space, knot the end using a piece of string that's already been wrapped, this will secure it into the piece. all done!


I used these for my booth, but until my next event, they've found a lovely little home in Adrienne's place - I'll share how she styled them soon. 

I also think they would be really great above a bed, if you don't have a headboard, or combined with other pieces to make a baby mobile, or you can use them to hold your earrings! The possibilities are endless.

If you decide to make your own, please leave a link below so we can catch a glimpe and get a few more ideas! Happy crafting!


xo. melisa

6.25.2012

fancy dish

I decided to do a little fun craft the other day and I'm just smitten with the results! I was inspired by this sweet tutorial from Elsie! I have many more ideas and can't wait to pick up some more dishes

Pick up some porcelain dishes (I got mine from Target for $1.99) and a sharpie pen ( I used a gold paint pen). Once you've doodled to your heart's content, bake the dishes for 30 minutes at 350 degrees. easy peasy.


Have a sweet day and a happy week, friends!


xo.
Melisa

4.07.2012

Toms Tutorial from Yellow Bird + Yellow Beard


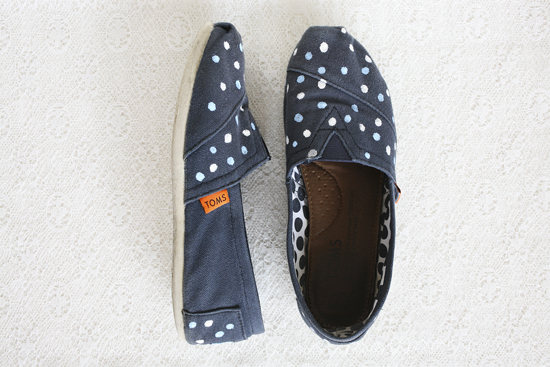
Hi Everyone! I've owned my navy blue Toms since 2006 when they first came out. But I've hardly ever worn them because I always feel so weird wearing navy blue shoes with navy blue jeans. I guess it makes me feel like I'm wearing a onesie on my bottom half only, hehehe. This last week I finally decided to add a little color to my Toms so I can start wearing them again. Perhaps you'd like to make your Toms a little extra special too?


What you will need:::

A pair of canvas shoes

Fabric paint
Q-tips {or paint brush}

I went with some pretty low key colors for my Toms because I didn't want to constantly feel like my shoes clash with my outfit. {Actually, if we're being honest, The Beard told me I needed to go with low key colors because he knew if I chose a bright color I'd feel like I needed to match it. At least he understands my neurosis right?} Since mine are navy blue I chose white and baby blue. 

I didn't want to completely cover any sections of my shoes and I also didn't feel confident enough in my sketching abilities to really do anything elaborate so I decided to just go with some cute little polka dots.

For starters I took the lid off the fabric paint and dipped the Q-tip directly into the paint bottle. I discovered that the canvas absorbed more of the paint than I expected so I had to get a quite a bit of paint on the Q-tip for it to really show up well. 


I began with the heel and sporadically placed dots of white paint. I skipped the middle portion of the shoe which I wanted to leave as it was and moved to the front part. It was really hard for me to place the dots randomly and not form a grid, but I think I did ok!


After I'd put as many white dots as I wanted I filled in the empty sections with baby blue dots.


At this point I thought I was finished but decided I just couldn't live without at least a tiny pop of contrasting color. What better place than the tags? I carefully stuck a piece of masking tape behind each of the tags to keep paint off the canvas behind them.


Then I used a paint brush to give the tags a very thin layer of paint so the letters would still show through.


Ta Daa! 
Now I have personalized Toms that will go with a wide variety of outfits. Just a splash of pattern and color was exactly what they needed.


I hope you have fun painting your Toms as well!

xoxo
Janee

For more fun DIY's from Janee, you can hop on over to her blog Yellow Bird + Yellow Beard!

3.22.2012

How to balance the creative with the daily


Have you ever felt like you were living two lives?? Like during the day you're worker, student, mom, etc... and then every other free moment you're crafter and blogger extraordinaire?? I know how difficult it can be at times to want to do one thing, but have to do another (ie work instead of sit at home blogging all the livelong day). It's tough being a blogger and a full time worker; it's even more difficult when you have other responsibilities as well. I'm no expert by any means, but I have found several things that have helped me through the years and things I'm having to resort back to now that I've started my full time job. I just thought I'd share these helpful tips with you, in case you may be struggling in this area.


1. You don't need to blog every single day. I know that this is difficult because I feel like I owe it to my readers to have something awesome to say, or to show pretty pictures or something else equally inspiring every day, but sometimes it's just not realistic. Sometimes the day simply has no free minutes and we have to remind ourselves that the blog world will go on. Your blog will be there the next day and the next and yes, your readers will be to. Maybe try not to make it a habit, but if you miss a few days here and there, the world will not implode.

2. Take photos of the little things. Sometimes we may feel like we can only post about our day if it's terribly exciting or there's an actual event, and so it's frustrating when we find ourselves only going to work and having a few hours at home... take photos of the little things throughout your day that make everything worth it; a yummy chai tea, a pretty sunrise, your new nailpolish, etc. Capturing these moments will not only allow you to share your day in a unique way, but also inspire you throughout the day.

3. Plan. We all know I love love to plan. Sometimes our lack of time comes from lack of planning. No one wants to live by a schedule, but it really is the most productive way to accomplish everything you need to. When I know I have a lot to do, I will grab a pen and paper and write out my to do's, then I'll list them in order of "Need to Get Done", then I list out my day by time and plug those things in accordingly. Sometimes things get left off and have to get done another day, but that's completely fine. Setting a schedule will help you utilize all the time you have and allow you to do the things you actually enjoy doing.

4. You make time for the things you care about. I love to craft and I love to blog, but I will never substitute time with family or friends to do either of those things. This was a promise I made myself in the very beginning. I never wanted to be so consumed with writing about my life that I wasn't enjoying the experience of those things. In the same regard, if blogging is your passion then you will cut out time for it, if that means you miss that episode of New Girl this week then so be it, or if it means you need to multitask and eat while you type, then do it! Whatever it takes.

5. Don't stretch yourself too thin. It's okay to say no. If you're like me, then you want to take on the world everyday, no matter what it means. I kind of strive on stressful situations (that's not terribly healthy) so I will usually say yes to everything asked of me. Also I'm a bit of a people pleaser, so that doesn't help. I think it's extremely important to make a list (surprise surprise) of your priorities, and list as many as you think is realistically possible to make important in your life. I'd say 4-5 is normal. My list goes like this: God, family/friends, work, ministry, personal time (craft, blog, etc). I'm not saying that's the best order and honestly sometimes it depends on the day, but those are the things of importance to me and things that I know I can have time for on a daily basis.  


I feel like there's so many more things to help us balance our time, but these are the ones that help me the most; it's not a recipe for the perfect well balanced life, but it is a start. Good luck and if you have any tips, share them below, I'd love to hear them!


xo.
Melisa

11.02.2011

Blue Berry Puff // Recipe

I've recently discovered a new love for cooking. I'm still learning so I love to get new recipes. I figured y'all might enjoy some of my new recipes too! So here's a super easy, quick little dessert recipe.

There are only a few ingredients and they can all be found at your local grocery store. Nothing is insanely hard to come by or expensive and you may have several in your home already. I used blueberries, but this can be modified to any berry or filling your heart desires!


To make the icing simply use 3 tablespoons of melted butter, 1 tablespoon of cream, and a half a cup of powdered sugar. You can add more to make more, but this usually covers six puffs.

I like to sugar my berries to make the inside a little sweeter^_^

As for the puffs, simply follow the steps on the box for proper baking instructions. Fill them up and top with some icing and you're all done!!


xo.
Melisa

8.12.2011

What I Wore & A How To


Well I don't know about you, but when I go to the store I seem to always find the perfect dress, but when I try it on it seems to be SO much shorter than I thought it was. I'm all for a cute mini occasionally, but most of the time I want something that's a little classier, you get me? So I decided to pair this dress with a skirt. It's a fun little trick that I've started to put into effect as of late. I took a lightweight skirt (the ruffled cream) and wore it underneath my dress to give it a layered look and add a little length. This works great for changing up the look of an old dress or for making a dress a little fancier without having to permanently alter the dress. It requires zero crafting skills and it utilizes things you may already have in your closet!


Dress: Forever 21 // 7.00
Skirt: Urban Outfitters // 10.00
Belt: Hollister // 3.00
Shoes: Target // 14.00
Outfit // 34.00

Today I'm moving a majority of my things into storage to get ready for the big move. I also have something exciting to share later today. Hope you enjoy your Friday!

xo.
Melisa

6.10.2011

Summer Style // Beach Waves

This weeks Summer Style is Beach Waves! It's really simple and perfect for that fresh Summer look. All you'll need is....
<<    Curling Iron (w/ no clamp)    >>
<<    Hairspray     >>
<<    Brush     >>
<<    Heat Protector Spray (optional)     >>

You can watch the video below to see how I do it. and if you have any questions, feel free to ask me in the comments. It's kind of a long video, but I cut out as much as I could... And as usual, I'm a little bit awkward, but hey, it's just who I am. ha! Hope if works for you!


6.07.2011

Summer Style


I'm very excited to introduce a brand new feature; Summer Style! I'll share all of my favorite style tips for Summer and hopefully help you expand your own^_^ 

I always like to find new ways to do my hair, or try out different colors or new scents SO without giving too much away, we'll take a look at hair how to's, nail polish tricks, dress tips, summer color crushes, pretty summer scents and a bunch more!

I'll share the first one this Friday, so be sure to check back! OH and if you have any suggestions of something you'd like to see, I'm definitely open to including them! Just leave a comment below. Have a lovely night friends!


xo.
Melisa